Since Halloween is quickly approaching, I thought would post a little tutorial on last year’s DIY toddler costumes (since I have yet to make the ones we are wearing this year…ahem.) Last October the twins were in love with “Winnie the Pooh and Tigger too,” so I decided to whip up a couple of DIY Pooh and Tigger costumes to match their enthusiasm. This post contains mini-tutorials for felt ears and a fluffy tail that could be adapted for lots of different animal costumes.

DIY Pooh and Tigger Costumes for Toddlers

Let’s start with Miss Sydney. Since she was so fond of her stuffed Pooh bear (that she still sleeps with to this day), it was only fitting to make her a “Pooh Princess.” The princess part was my idea. So I like tulle. Sue me.
The main part of the costume was easy. I found a red short-sleeved tee and a white long-sleeved tee at Target and a pair of white cotton toddler pants at Hobby Lobby. I used Rit dye![]() to tint the white garments golden yellow, sewed golden yellow tulle around the bottom of the shirt (a totally last-minute addition) and the cuffs of the pants, and used yellow cording to spell “Pooh” in child-like lettering on the shirt. After that, it was time to accessorize.
to tint the white garments golden yellow, sewed golden yellow tulle around the bottom of the shirt (a totally last-minute addition) and the cuffs of the pants, and used yellow cording to spell “Pooh” in child-like lettering on the shirt. After that, it was time to accessorize.
DIY Honey Pot

Every Pooh needs a honey pot! To create ours, I took a 99¢ pumpkin from Walmart, covered it with brown Duct tape, and used more of the yellow cord to spell “Hunny” on the front. Now all we needed were some ears. Follow along with this mini-tutorial to make your own!
DIY Felt Ears

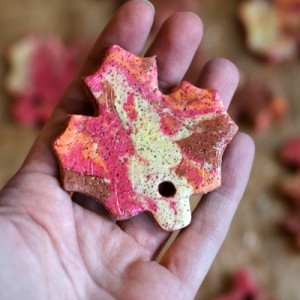
First, gather your supplies. You will need a sheet or scraps of felt in your main ear color (I used yellow) and a lighter color for the inside of the ears (I used a peachy color shown above).

Find a circle (or whatever shape you want your ears to be) and trace two of the main color and one of the inside ear color for each ear. I used the end of a roll of tulle for my template. After cutting the inside color, trim it down by about 1/3 (shown above).

Next, sew or glue your inside piece to one of your outside pieces. I used a straight stitch with pink thread and an 1/8 inch seam allowance.

After attaching your inside circle, go ahead and sandwich your second outside piece to the back and sew it all together around the outside of the large circles with a zigzag stitch (or glue). When you are done, your ear should look roughly like the one above.

Pinch the bottom of your ear together as pictured above. Not a full taco, more like a taco that doesn’t want to commit.

Fold the portion you pinched over to one side and flatten (as shown above).

Sew down your little flap with a straight stitch (or use glue).


You’re on the home stretch now! Your ears are basically done. Now you can decide what to attach them to. For Syd, I decided to attach them to alligator clips![]() so she could wear them as “bows” with her pigtails.
so she could wear them as “bows” with her pigtails.

I simply covered a clip with yellow ribbon and hot glued it to the back of the ear.

If you want, you can make some little bows to place at the base of your ears. Covers up some of the ugly stitching (if you have any like I did). I made some from ribbon and buttons and glued them right on.

You could also attach your ears to a headband (not pictured) or a hat. Will got a simpler pair of ears attached to a $1 knit hat, again from Wally World.
DIY Tigger Candy Bucket

He also got a striped candy bucket (made with another cheapie jack-o-lantern bucket and black tape) and the trounciest, flounciest, bounciest Tigger tail you ever saw! And it literally took me five minutes to make!
DIY Tigger Tail


If you want your own, you will need a giant pipe cleaner in your color of choice, smaller pipe cleaners to wrap around the large one if you want stripes, a scrap of matching felt, a hot glue gun, and a safety pin. I found my giant pipe cleaner at a craft store- you can find something similar here![]() .
.
To make, decide how long you want to make the tail and adjust length as necessary. If you need to cut the large pipe cleaner, be sure to bend and twist the ends so the fur doesn’t shed everywhere. Wrap your smaller pipe cleaners around your larger one for stripes and twist to secure.

Last, cut a rectangle from your felt and use it to sandwich the end of your tail. Secure the sandwich together around the tail with hot glue (see above) and let dry. Now you can use the safety pin to attach the tail to your outfit through the felt tab.


I attached Tigger’s tail to his costume, which was a simple longjohn I made from Riley Blake’s tone-on-tone orange chevron. Perfection! Now, let’s see how long I can wait until I actually make this year’s costumes ![]()
If you liked this post, please consider subscribing by email:
Subscribe to Twodaloo by Email


These are just too cute!!!! I am so in love with them!!
So much cuteness!! Great costumes.
Peanut wants to be the same thing as last year (a scarecrow) so I’m getting off easy this year.